The Thanksgiving to New Year’s holiday season is a fantastic time to take photos of the family and extended family when everyone gets together. It is fun to see the changes from year to year as the kids and grandkids grow and flourish. Whether you are shooting with a smartphone camera, a point-‘n-shoot camera, or a DSLR camera, following are guidelines, not rules, for getting great shots:
- Plan ahead – this is a common theme in most of my shooting. It doesn’t have to take long but is well worth the time investment. If you are getting together with friends and/or family, make a list of the photos that you would like to take: different combinations of people together; the table; the food; the decorations in your home; or scenes like the fully set up table with the turkey on it, for example. Hang the list on the fridge and check off as you go.
- Know how to use your equipment before you need to start shooting. It is never a great idea to be learning when a group is waiting for you to click the shutter. So, take a few test shots a day or 2 before the holiday/event.
- Keep in mind how you will be using the photos. If you are only going to display them on a PC or on social media, then filling the frame (as I describe below) will not be an issue. But, if you will be printing the photograph, some of the standard sizes like 5 x 7 and 8 x 10 do not match up with the image size that your camera will most likely produce. This means that you will need space on the left and right sides of the image to be able to print for those sizes. An example of what I am talking about is detailed below. The standard size 4 x 6 will print fine.
- Take photos of the food like the turkey, all the fixings, pies, etc. before the guests arrive and definitely before you cut in to them. Take the shots from different angles and perspectives being sure to watch what other items are in the shot like a sink full of dishes.

A turkey made from an apple by my dad.
- Assign some of the photo duties for candid shots to another person like a teenager. Several years ago, at my youngest daughter’s wedding, I handed my camera to a friend of my son and showed him how to use it, mostly in auto mode. He not only enjoyed taking the photos, he captured some great candid’s, especially one of my dad with his signature wave which is hanging on my wall. You will end up with many memories that you had not planned on or expected.

- If you are shooting with a smartphone – do not use the zoom feature on the camera. It is not a true zoom and will reduce the quality of your photos. Rather, zoom with your feet! Meaning, get closer to the subjects.
- If you are shooting with a camera, use a wide lens that does not create any weird distortion which can sometimes happen. Using a wider lens and zooming with your feet will create a bit more depth-of-field keeping the image sharper.
- Do not use flash. Flash will cause harsh looking photos with ugly shadows-not very flattering or pleasing. Use available ambient light by pulling back curtains and turning lights on. Try HDR mode on smartphones. Increase the ISO on cameras if needed. If you absolutely have to use flash because it is just too dark, then bounce the light off the ceiling. Direct on-camera flash is the worst type of lighting. Practice a day or 2 before to see what the best lighting is for the time of day. Try to shoot when it is still light outside. Don’t wait until later in the afternoon. If the weather is nice, shoot some of the family shots outdoors, in the shade if the sun is bright.
- Consider using a tripod or some other type of support in lower light conditions. This will make sure that the image is sharper.
- When shooting a group shot, shoot down from above rather than level with the group. Not too high though. Shoot from a chair or a step stool. Shoot from a tripod and use the self-timer to get yourself in the shot too. Make sure no-one bends over or squats down. Fill the frame with faces, making sure that no-one is overlapping. When filling the frame plan for extra space on the sides for printing 8 x 10’s. The lighting on the faces should be as even as possible with no shadows on any of the faces. Move heads slightly to get rid of the shadows. Try to get everyone as close together as possible. Avoid any gaps and spaces at the top or sides of the frame. If you are taking a shot with everyone around the table, take the photo before dinner is served (tables while eating or after dinner never look as nice as before dinner is served), maybe with someone holding the turkey or roast platter getting ready to set it on the table. Make sure that everyone is in focus. Shoot as many images as quickly as you can. The goal is to get 1 great shot by shooting maybe 10 or 15 shots. The group will only cooperate for about 2 minutes.

So, what is wrong with this shot? It’s not a bad, but it is not great. There are several things that could have made it a better image. Here is the rundown of where I missed the mark:
– This image was shot from the deck, about 10 feet up plus another 5 feet on the tripod. Probably a bit too high but still ok. If I had planned the shot better, I might have taken it from a lower angle.
– I did not leave enough room on the right and left sides of the image for an 8 x 10 photo which is what I wanted to frame. I took the photo full-frame in the camera instead of full-frame for how I was going to use the image. It is fine for posting online but here is what it looks like as an 8 x 10.

Unfortunately this can’t be fixed in Photoshop. The only solution is a custom cut matte and possibly a custom cut frame. I should have positioned everyone closer together.
– The next issue is that I did not plan this shot until the last minute when I discovered that I did not have enough room in the house. So, we moved outside. Lighting was nice and even. But, I did not notice the swing to the right when I was framing the shot. And one of the legs of the swing looks like it is coming out of Bill’s head. Ugh. That can be fixed in Photoshop but if I had been prepared and paid better attention, I would have gotten it right in the camera!
– Do you see the next issue? Janice is crouching down. Why, I am not sure. And I did not see it at the time. I was more focused on clicking the shutter and running down the stairs to my spot before the 10 seconds ran out on the timer. If I was better prepared and setting everyone up better, then I would have avoided the issue. And Shashi is kneeling with Ava. I think the image would have been better if I positioned him differently. Lastly, as stated earlier, having everyone move in a little tighter would have helped the image and maybe even solved the size formatting issue.
– Other than that, great color, great smiles, great exposure, everyone is in focus, and a great way to document our family in 2009. The 2017 photo will look much different. Kids have grown and there are some new additions to the family.
- With a DSLR, use a wider lens and get closer which will increase your depth of field so that you can shoot maybe at 5.6 and still have a sharp focus. But you may have to shoot at F8 depending on how everyone is positioned. Keep shutter speed at 1/60 or faster to avoid motion blur by your shaking or movement of the subjects. Increase your ISO to 400 or 800 depending on the lighting. On some cameras, the ISO can be turned up even higher without losing image quality. Take some test shots beforehand and checkout the grain when enlarging the image. If you have to use flash, remember that shutter speed controls the ambient light and F-stop controls the amount of light from the flash along with the flash settings. I always shoot in manual mode on the camera when using flash with the flash in ETTL mode. I typically use a diffuser on the flash and bounce off the ceiling. After a few test shots, I may have to adjust the flash exposure compensation. My ultimate goal when using flash is to capture as much of the ambient light as possible with the flash just providing some fill making it look like I was not using a flash at all.
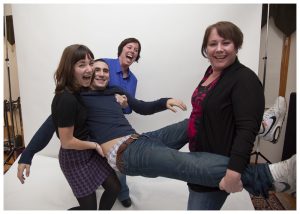
- For individual and small group shots, shoot from unique angles like the subjects sitting on the floor and you shooting laying on the floor. If the subjects are standing, shoot from the waist up. Don’t place the heads in a straight line. Try to create triangles with the heads. Watch for shadows! And watch the backgrounds. These photos were taken on Thanksgiving with a simple drop cloth background.


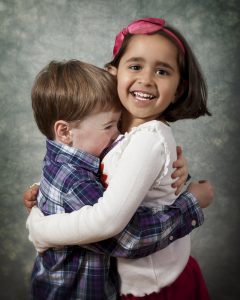
- When shooting kids, don’t try to control them too much. Let the kids be kids and you will end up with some great, unexpected shots. Let them get a bit crazy. Big kids and little kids. It is fun. Just keep shooting and let them go.

- Beware of the background when shooting inside or outside. Try for as plain and clean of a background as possible, when possible, which is not always possible. I will sometimes shoot against a blanket, sheet, or big piece of cloth from the fabric store. Backdrops are fairly inexpensive and can be taped to a wall. Stand a few feet away from the backdrop. Fill the frame watching what is included in all of the edges. If you don’t want it in the photo, then leave it out of the frame.
- Make the shooting experience fun for the subjects and you will have fun with it too!
I hope these tips help you in capturing some great shots over the holidays. Please drop me a note if you have any questions: nick@nickdepasqualephotography.com. Join me for a tutoring session. Check out my website at www.nickdepasqualephotography.com. Or join us for the Springtime In Berlin Photography Workshop.